You will never have to buy kombucha again with this at-home recipe! Everyone in our home drinks kombucha (even Carrington). We affectionately refer to it as “Boochie”. Making your own kombucha can save you hundreds of dollars a month if you drink it on a regular basis. I experiment with fun flavours like strawberry/ mint, blueberry/basil, raspberry, turmeric/orange. Today, we are going to learn How To Make Your Own Kombucha – No Pre Scoby.
In this recipe, you don’t need to start a kombucha from scratch. The best part of this recipe is that you’re going to use a storebought kombucha to make another! Typically, you will need to order a scoby but I’m going to share with you my secret shortcut to delicious drinks.
The process is actually very simple. If you’ve ever made yoghurt, you’ll see the process is very similar.
What is a scoby? It’s actually an acronym: Symbiotic Culture Of Bacteria and Yeast. You may also hear it referred to as: Mushroom or Mother. A scoby looks like a rubbery raft that floats on the surface of the kombucha. IT IS NOT PRETTY, but it does magical things! It transforms sweet tea into tangy, fizzy, cleansing kombucha. It also seals of the fermenting kombucha from the air and protects it from the outside, undesirable bacteria while it’s fermenting.
How Does it Work? A scoby is a naturally occurring part of the kombucha brewing process. It’s ever-present and It’s constantly renewing itself. A new layer of scoby will grow on the surface of the old one every time you brew a batch of kombucha! You’ve also all probably bought a bottle of kombucha with a little blobby thing inside? Well, that’s actually a tiny, newly forming scoby. This ability of the scoby to constantly reform itself is what makes it possible for us to grow a new scoby from scratch.
You grow a new scoby from scratch by combining cool strong tea, sugar, and some pre-made kombucha. You can use homemade kombucha from a friend or store-bought kombucha, but make sure it’s a raw, unflavored variety. It also helps if you can see one of those little blobby things floating at the top or bottom of the bottle.
KOMBUCHA BREWING TIPS:
- When making batches of kombucha be extra vigilant with the cleanliness of jars and utensils and ensure you wash your hands and rinse off any soap residue on jars and tools. Part of the job of the scoby is to protect the kombucha while it ferments. A jar of kombucha without a scoby is vulnerable to any bacteria that are floating around the environment.
- Keep the kombucha covered and away from direct sunlight, also ensure its somewhere where it won’t be bumped and bashed.
- The kombucha should never smell cheesy or rancid. If it does, or something has gone wrong and you should start again.
- Keep an eye on it. Bubbles, jelly-like masses and gritty brown-coloured residue are good. Any fuzzy black or green spots are bad! The liquid in the jar should always smell fresh, tart and slightly vinegary. The longer you brew the tea the more pronounced the vinegar taste will be.
- Fruit flies love kombucha. If you find it’s attracting them to move them to another location or set a decoy trap (a mixture of vinegar and dish soap). Email me if you have more questions about a fruit fly trap.
- It takes time. Making a scoby and brewing kombucha takes about 2-4 weeks. The time might be less if your kitchen is warm or longer if your kitchen is cool. In general, try to keep your kombucha at an average room temperature of about 21 degrees, and your scoby will form in a little over two weeks. Taste the tea on regularly and when it is to your taste move it to glass jars to store in the fridge.
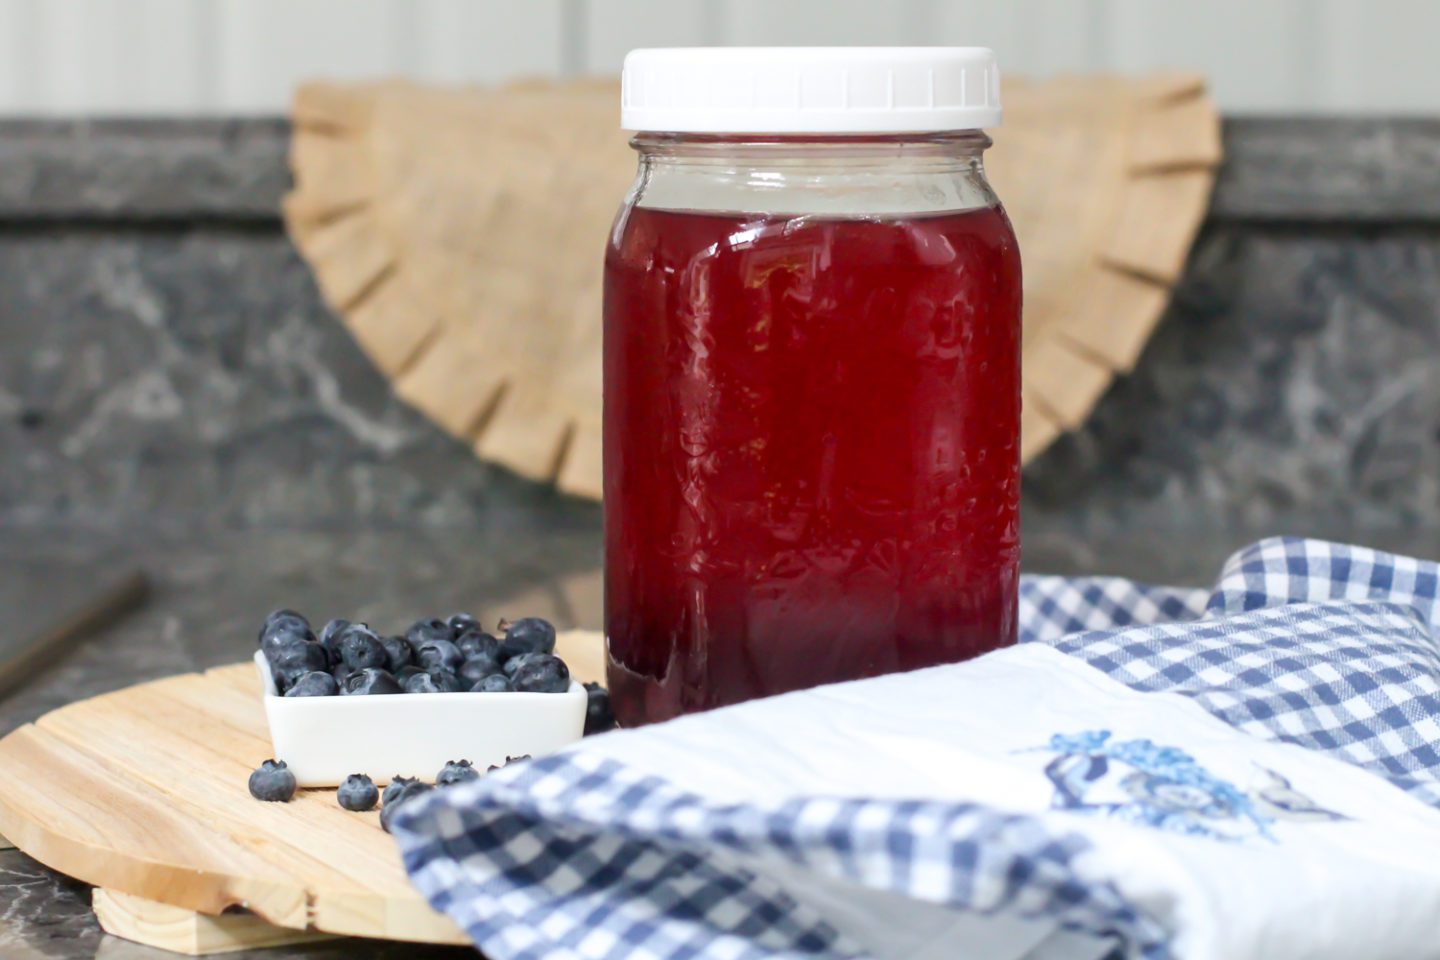
- Make it your own! I add fresh fruit to my kombucha making combinations like strawberry/mint, blueberry/basil, orange/turmeric, raspberry/blackberry.
I’ve used this method for years and it’s worked every time. If you have more questions, pop a comment in the section below and happy brewing! This is the jar that I’ve purchased on Amazon – it’s perfect for this! Scroll below for a full list of ingredients and instructions.
If you’re interested in more beverage recipes on Susan Cooks Vegan, check out my Strawberry Shake Surprise and Baby Blue Spirulina Smoothie.

How To Make Your Own Kombucha
Ingredients
- 12 cups water
- 1 cup white granulated sugar
- 6 bags of green or black tea, or use loose-leaf as per directions
- 6 cups unflavored, unpasteurized store-bought kombucha
Equipment needed
- Large saucepan
- Long-handled spoon
- Large glass jar, like a canning jar (not plastic or metal) Like this one on Amazon.
- Tightly woven cloth (like tea towels, or a t-shirt cut to size), coffee filters, or paper towels, to cover the jar
- Rubber band
Instructions
Make the strong sweet tea. Bring the water to a boil. Remove the pan from heat and stir in the sugar until it is completely dissolved. Add the tea and allow to steep until the tea cools to room temperature. Remove and discard the tea. (Alternatively, boil half the amount of water, dissolve the sugar and steep the tea, then add the remaining water to cool the tea more rapidly.) *Ensure the tea is completely cooled or it will kill the cultures!
- Combine the sweet tea and kombucha in a jar. Pour the sweet tea into the jar. Pour the kombucha on top — if you see a blobby “baby scoby” in the bottom of your jar of commercial kombucha, make sure this gets transferred. (But if you don’t see one, don’t worry! Your scoby will still form and the tea will brew.) Stir to combine.
- Cover and store for 1 to 3 weeks. Cover the mouth of the jar with a few layers of tightly-woven cloth, coffee filters, or paper towels secured with a rubber band. The length of time you brew your tea will depend on your taste. If you enjoy stronger-tasting kombucha brew it longer.
- Place the jar somewhere at average room temperature, out of direct sunlight, and where it won’t get jostled. Sunlight can prevent the kombucha from fermenting and the scoby from forming, so wrap the jar in a cloth if you can’t keep it away from sunlight.
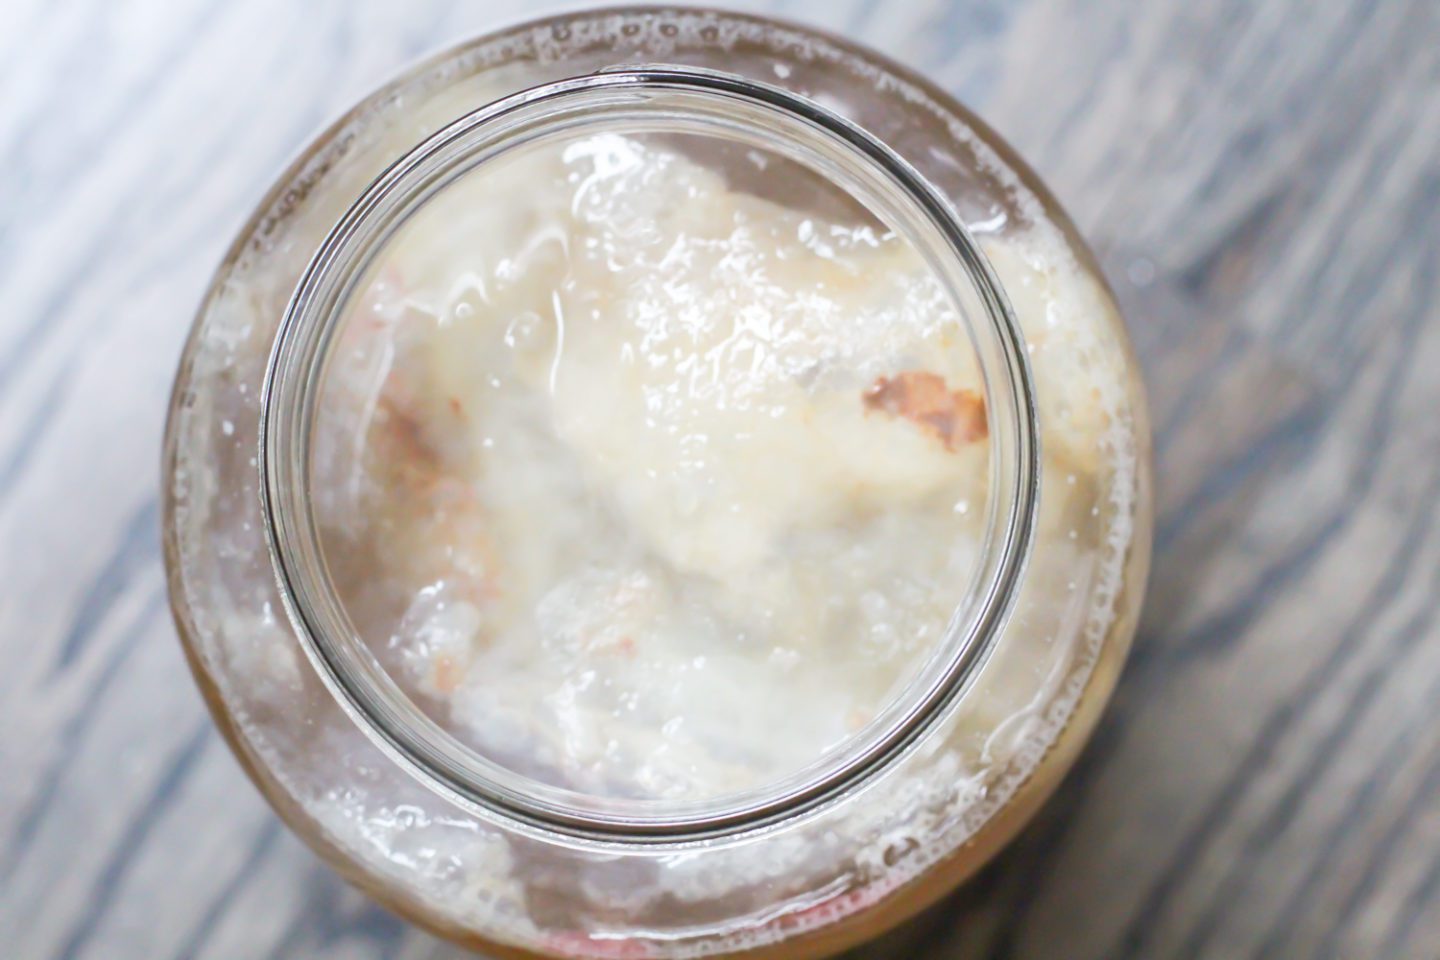
- First, bubbles will gather on the surface. For the first few days, nothing will happen. Then you’ll start to see groups of tiny bubbles starting to collect on the surface.
- Then, the bubbles will collect into a film. After a few more days, the groups of bubbles will start to connect and form a thin, transparent, jelly-like film across the surface of the tea. You’ll also see bubbles forming around the edges of the film. This is carbon-dioxide from the fermenting tea and a sign that everything is healthy and happy!
- The film will thicken into a solid, opaque layer. Over the next few days, the layer will continue to thicken and gradually become opaque.
- Taste your tea. Save half of the tea to start your next batch. After a few weeks, when the tea is to your liking. Pour half of the tea into a clean glass jar and store in the fridge. I like to add fruit to mine for flavour.
- Make more sweet tea and start again! The more tea you brew the bigger and stronger your scoby will get. The tea will brew a little bit faster each time. It is important to keep tasting the tea. If it brews too long, it will taste like vinegar and can be upsetting to your stomach. If it turns to vinegar you can use it to clean your counters!
Can I use can of kambucha brought from store?
Yes you can! Ensure the kombucha is high-quality. Look for lots of sediment at the bottom.
Hi. I have some kombucha with mother (homemade) at the bottom that someone gave me 6 months ago. I’ve kept it in my fridge with a lid on and it smells pleasant (no vinegar, no black or green in there either) . Can i use this to start making kombucha or do i need something that is more fresh.
Hi Renate,
Yes! This kombucha sounds like it should work well. The mother, or the sediment at the bottom is what will continue to grow to make more kombucha. Let me know how it goes!
With gratitude,’
Susan
Can I use a flavored sugar free kombucha from the store?
Hi Victoria,
Any kombucha should work as long as it is fresh and has the living silty string (goop) at the bottom.
I just wanted to thank you for the most comprehensive recipe I’ve come across. I recently stumbled upon the benefits of kombucha tea and I knew nothing about it. I have been reading as much as I can to understand the process, but it was still fairly confusing to me. You explained this perfectly and I’m now excited, with a bit of confidence, thanks to you, to start brewing my own. Thank you so much for putting this together and I will be sharing this with others.
Reading this comment made my day!🤩 I’m so glad you found this helpful. Please let me know how your brew turns out.
Susan 💗🌱
At what stage do you add the fruit? Do you add it to the tea/kombucha combo as its brewing or while you’re serving it in a cup?
Hi Rebekah,
To answer your question, I bottle my kombucha after brewing and store in the fridge to drink. I add fruit and/or chia seeds to these bottles. I find adding the fruit adds a delightful natural sweetness and color. The chia seeds add a nutritional punch that I love!
Let me know if this helps and how your tea turns out.
Susan💗🌱
No Pre Scoby….. Then in the recipe,, It says to get store bought kombucha for some scoby go figure
No pre scoby mean you don’t need a scoby *before* brewing the kombucha. A scoby will naturally form during the first brewing process that can be transferred to new batches. I hope this clears up the confusion. ☺️
Susan
This is my first batch of Kombucha using your method, I made it from scratch, (no scoby), using store bought K. and I now have 21/2 gallons of vinegary Kombucha… is this ok to drink? Lastly, is it ok to store my newly formed scoby soaking in the vinegary Kombucha while storing it in the fridge until I’m ready for another batch?
Mark
Hi Mark,
I am glad this recipe worked out for you! I find that store-bought kombucha is so expensive these days and it is so simple to make it yourself. 💁♀️
If your kombucha is vinegary it means it brewed for too long. One way to avoid this is to taste-test the batch periodically. If the vinegar taste is too overpowering you could use it as a cleaning agent. If the taste is still acceptable, try adding some fruit like raspberries, blueberries, or strawberries to add natural sweetness (and pretty colors) , or you can dilute the kombucha with more tea.
For your new baby scobby *DO NOT STORE IT IN THE FRIDGE!* If the scobby gets too cold it may die. 🙁
I hope this helps. Let me know how your kombucha turns out of if you have any more questions.
With gratitude,
Susan 💗🌱
Is brown sugar ok to use instead of granulated?